Category Archives: Help
VMware Test Successful – *New* Starter Kit with a Soft Tech Support Gateway
The Virtualbox Soft Tech Support Gateway build was just tested successfully using VMware by exporting the Virtualbox instance from Virtualbox using the Export Appliance command, and then using the File –> Open command under VMware to import the appliance into VMware.
— Updated: We are now shipping the Virtualbox instance as an exported appliance, which is VMWare ready for import.
Java issue at remote site computer
If the plcremote app pops up a window briefly and then disappears there is most likely an issue with Oracle’s Java installation.
Download the free Java installer from Oracle at the Link shown below:
Click on this link to download Java https://www.java.com/en/download/
Below are instructions for testing for a correct installation of Java on the remote site computer.
On windows 7 click the start button in the lower left hand corner.
(Click on images below to enlarge)
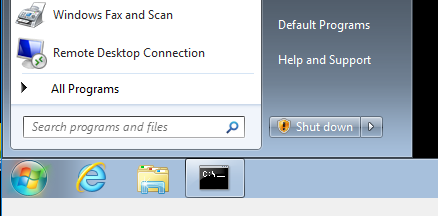
Type in Run and select Run at the top.
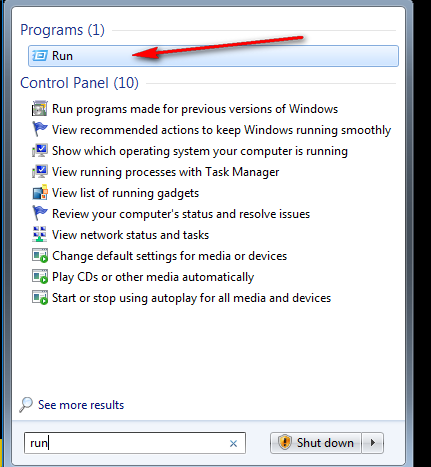
Type in cmd to start a command prompt window.
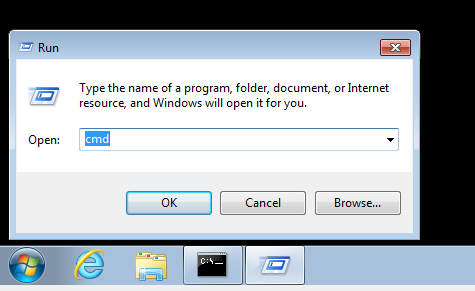
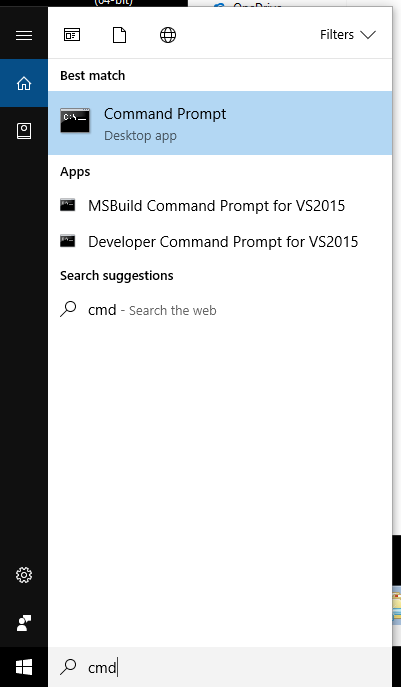
On windows 10 type in cmd in the search bar in the bottom left hand corner and select command prompt to start a command prompt window.
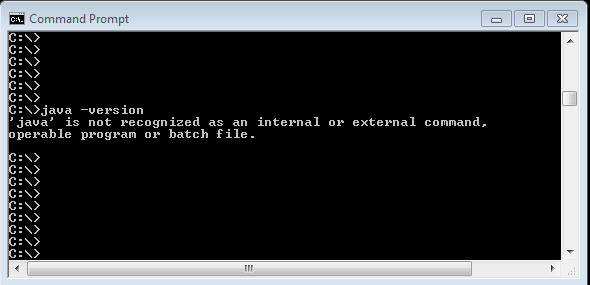
In the command prompt window type in java -version and press the enter key. You should see a successful report of the version installed, if you don’t then there is an issue with the Java installation, go back and re-install until this test is passed.
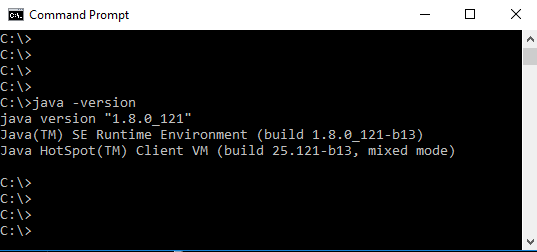
An correctly installed version of java or no version installed will report as shown below.
Siemens Step 7 Simatic S7-300 PLC on Ethernet Step by Step Guide
This is a remote connection session to a Siemens S7-300 PLC on Ethernet using Siemens Step 7 Simatic Software.
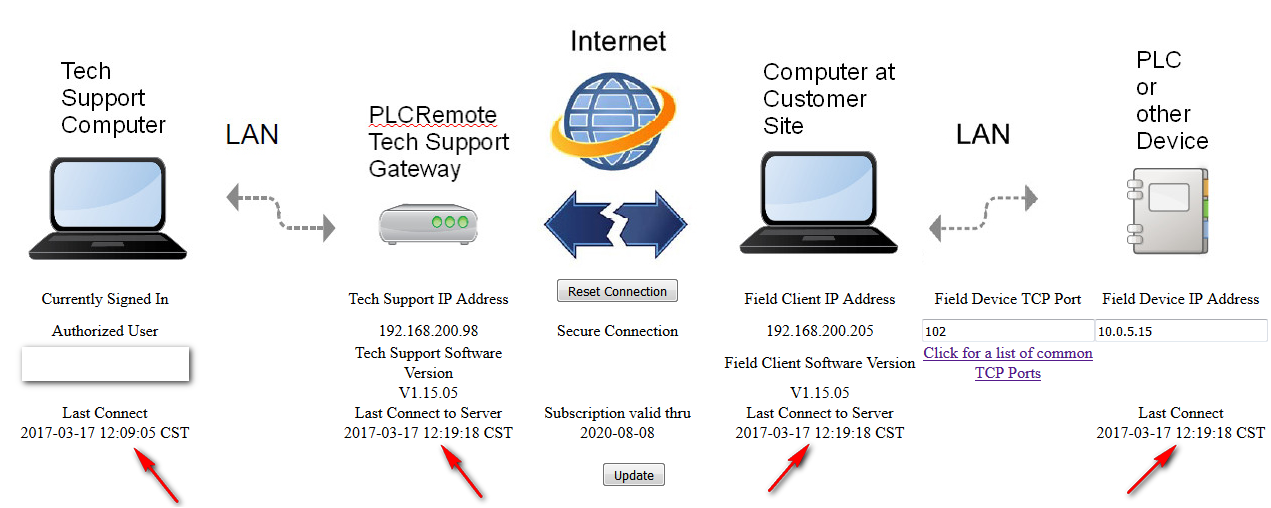
The PLC resided on a private 10.0.5.x subnet using a CP 343-1 ethernet module. First login to your web page “Manage My Remote” on the plcremote.net website. We saw the screen below:
(Click on images below to enlarge)
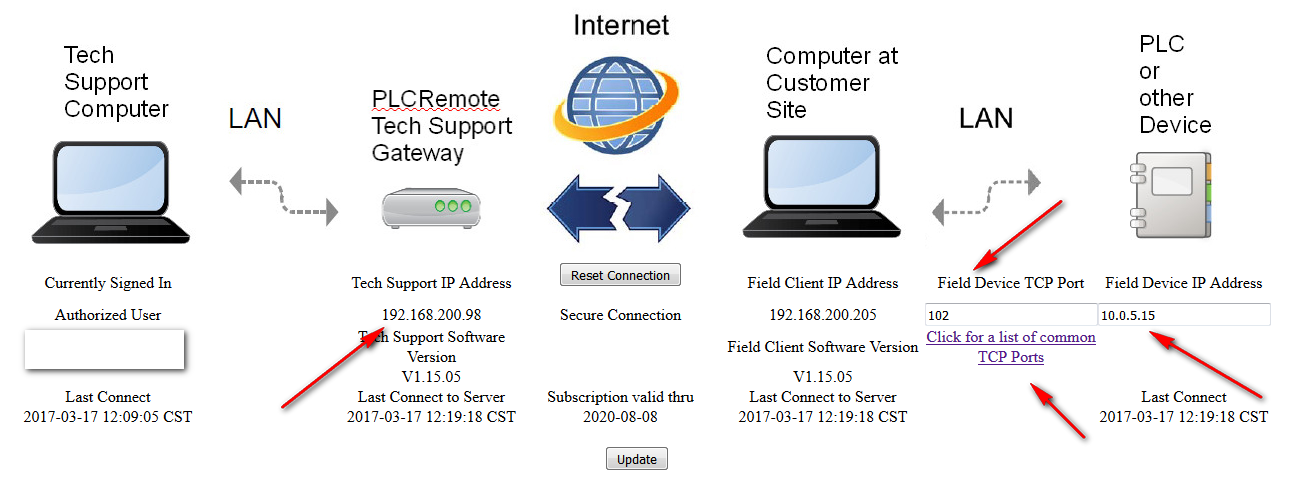
We entered the Field Device TCP Port number 102 which was found by clicking on, “Click for a list of common TCP Ports” shown on the “Manage My Remote” screen, and we entered the hardware configured IP address of the PLC as 10.0.5.15 in the Field Device IP Address box.
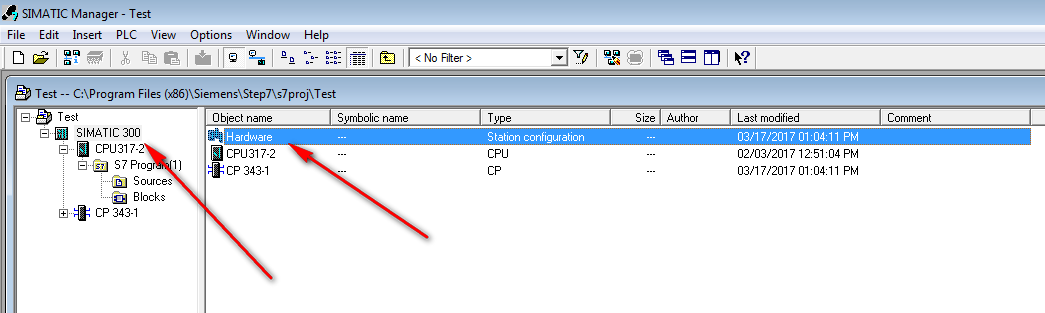
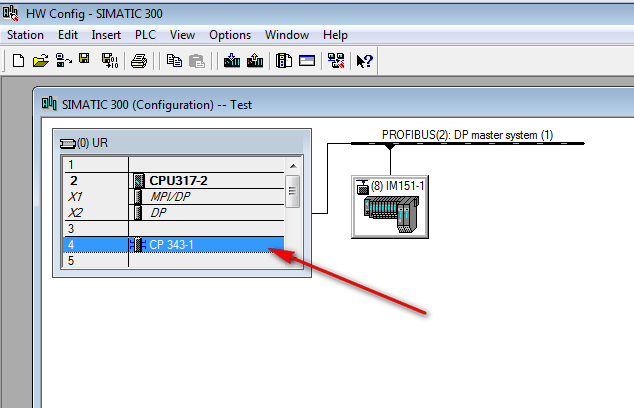
Next open the Siemens project and find the Hardware configuration line as shown and by double clicking open the Hardware configuration screen.
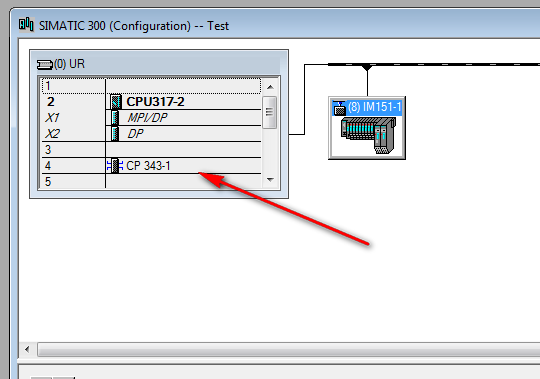
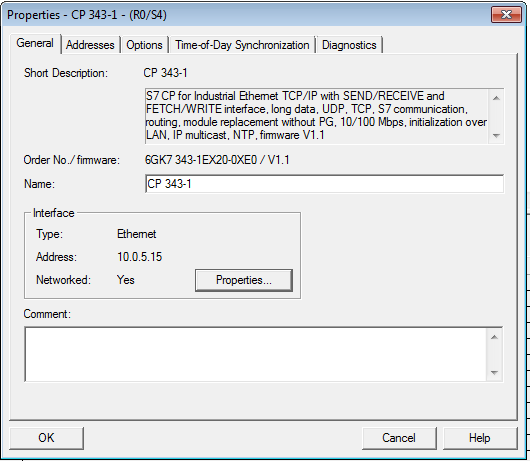
Then double click on the etherne module as shown below:
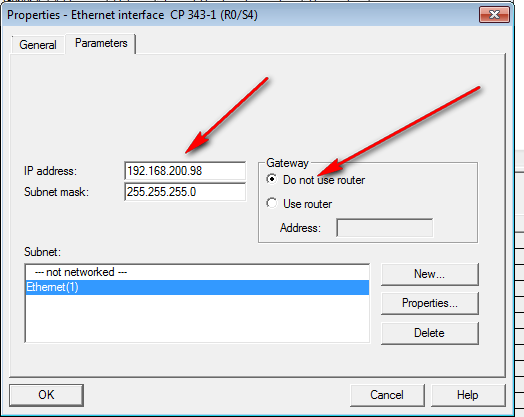
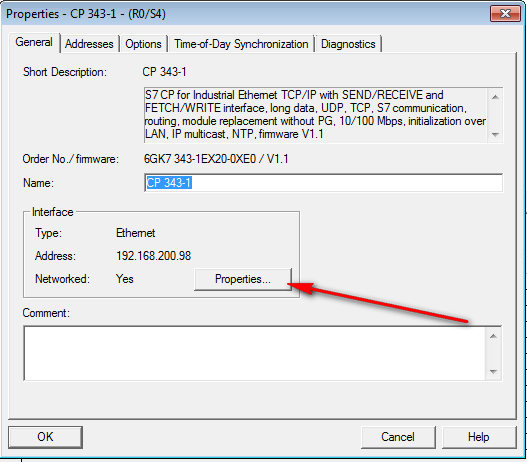
This opens the Properties box for this ethernet module. We are going to temporarily change the IP address in the project only, and then restore it later after we finish this session. Click on the properties box as shown below:
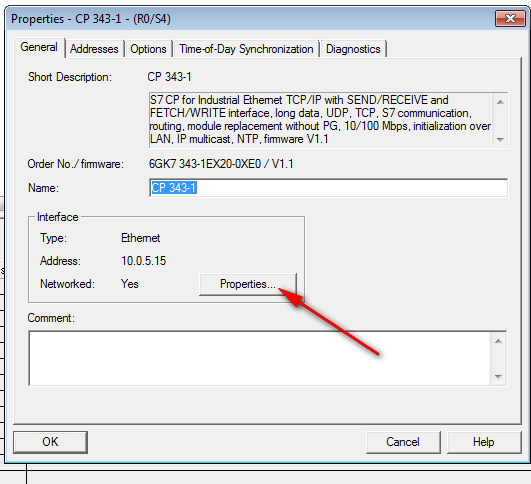
Record the IP address and Router address if it is used before making changes.
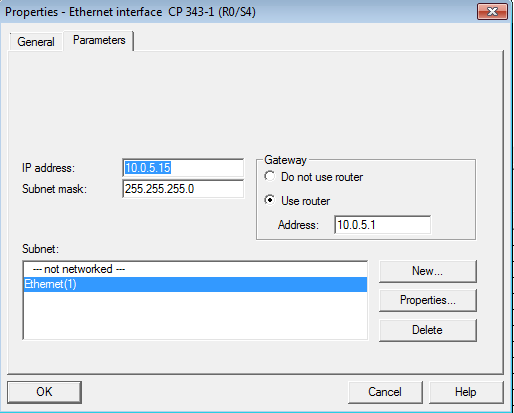
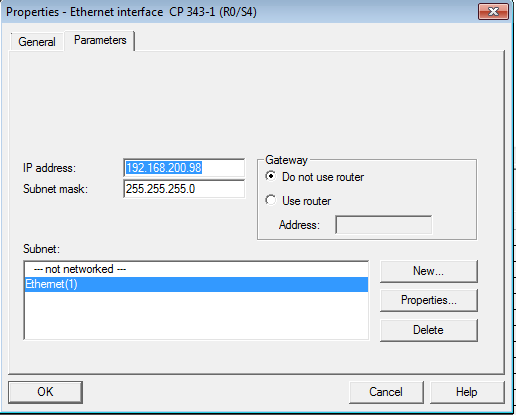
We changed the IP address to match that of our technical support gateway, and the subnet mask must be the same as the technical support gateway subnet. We also, checked do not use router as it is not required since our tech support gateway is on the same subnet as our development PC that is running the Step 7 development software. Then advance by clicking OK.
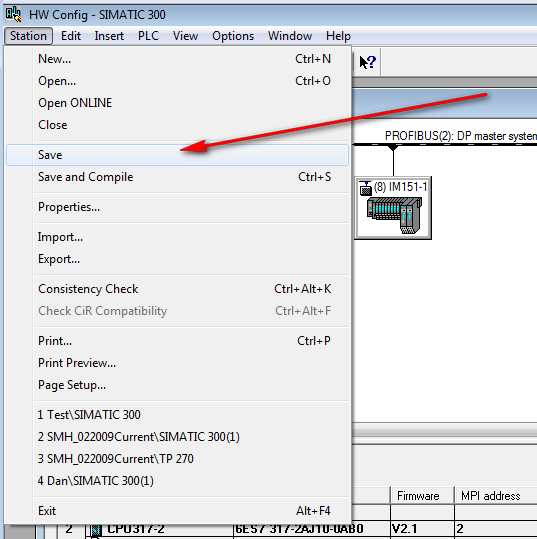
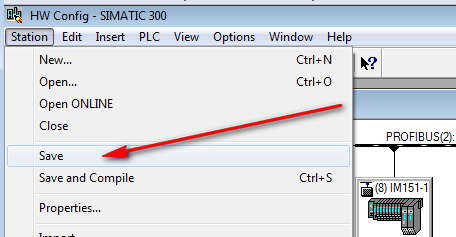
Then save the configuration (remember this just saves it in the windows PC project only, be careful not to do any hardware configuration updates on this PLC ethernet module. In our test we are just going online with the PLC to observe a VAT table.
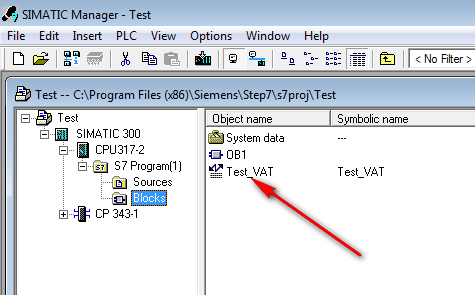
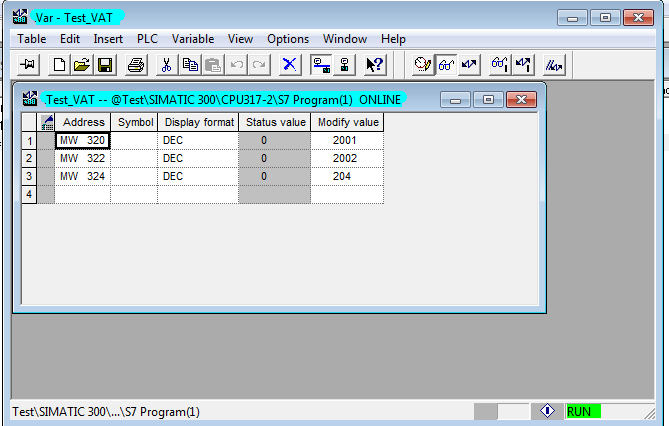
Next we go back to the main Simatic Manager and open Test VAT
Then we click on the eye glasses which puts this VAT online with the PLC and also puts the VAT table into live monitoring mode.
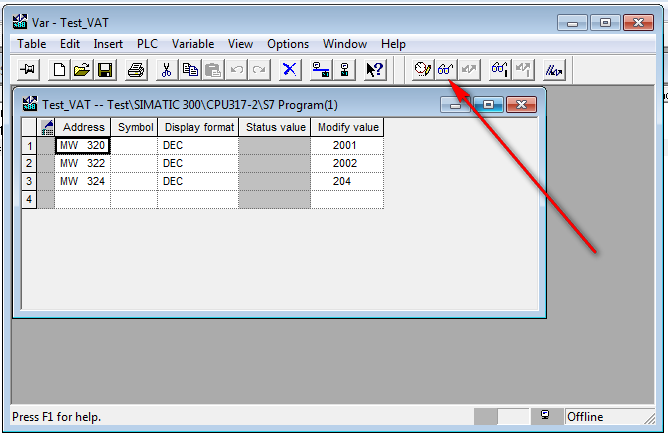
The status below shows connected to the PLC.
Now we are done with our monitoring, so we go back to the Hardware configuration screen and open the Ethernet module to reset its properties back to their original state.
Open properties.
Change these IP addresses back to the original settings.
Original settings are shown restored below.

Press OK.
Save the hardware configuration which only saves into the local windows PC project files.
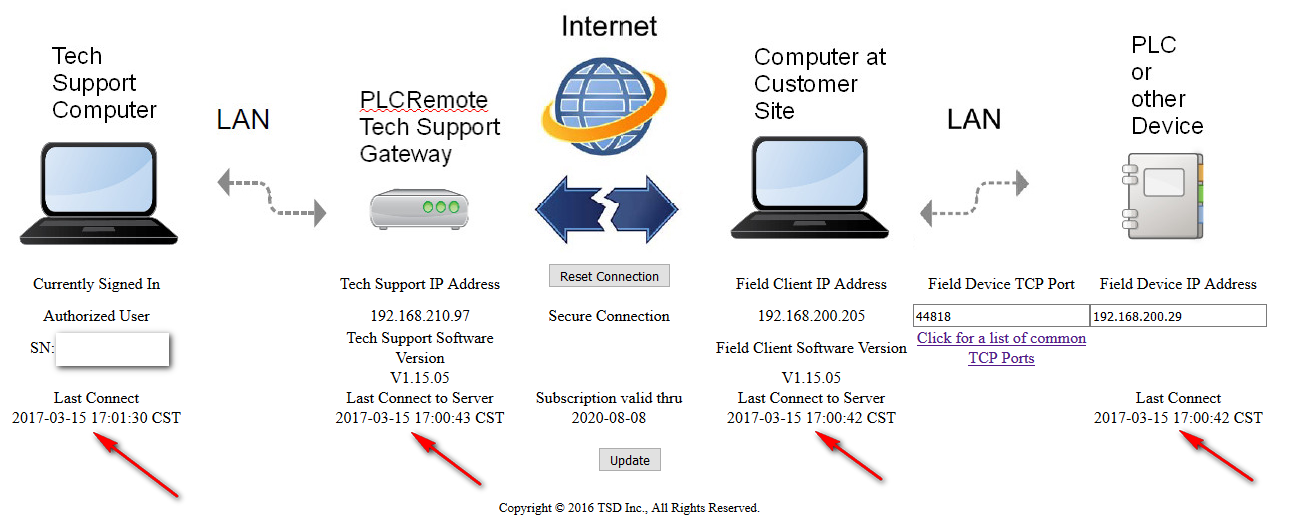
As a diagnostic check, a successful connection will show a current time stamp status on all devices as shown below on the web page “Manage My Remote” on the plcremote.net website. If one of the time stamps is not current, then this could indicate an issue with that device or the connection of that device.
GE Proficy using GE Series 90-30 PLC Step by Step Guide
This is a remote connection session with a GE Series 90-30 controller. The CPU module tested with was a CPU 374 Plus.
The PLC resided on a private 192.168.1.x subnet. First login to your web page “Manage My Remote” on the plcremote.net website. We saw the screen below:
(Click on images below to enlarge)
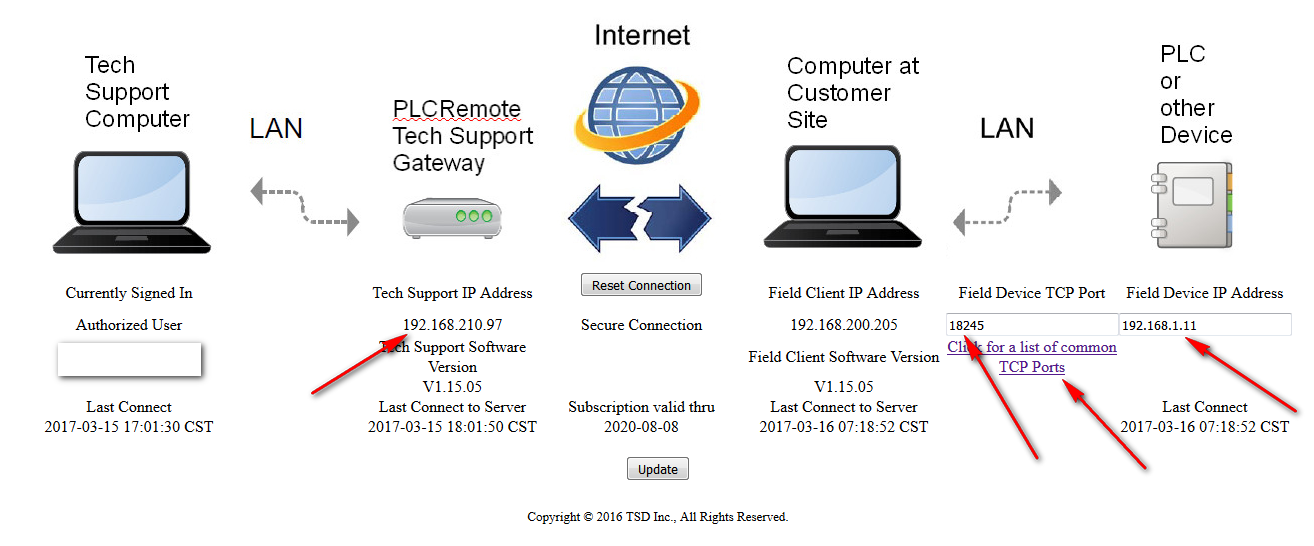
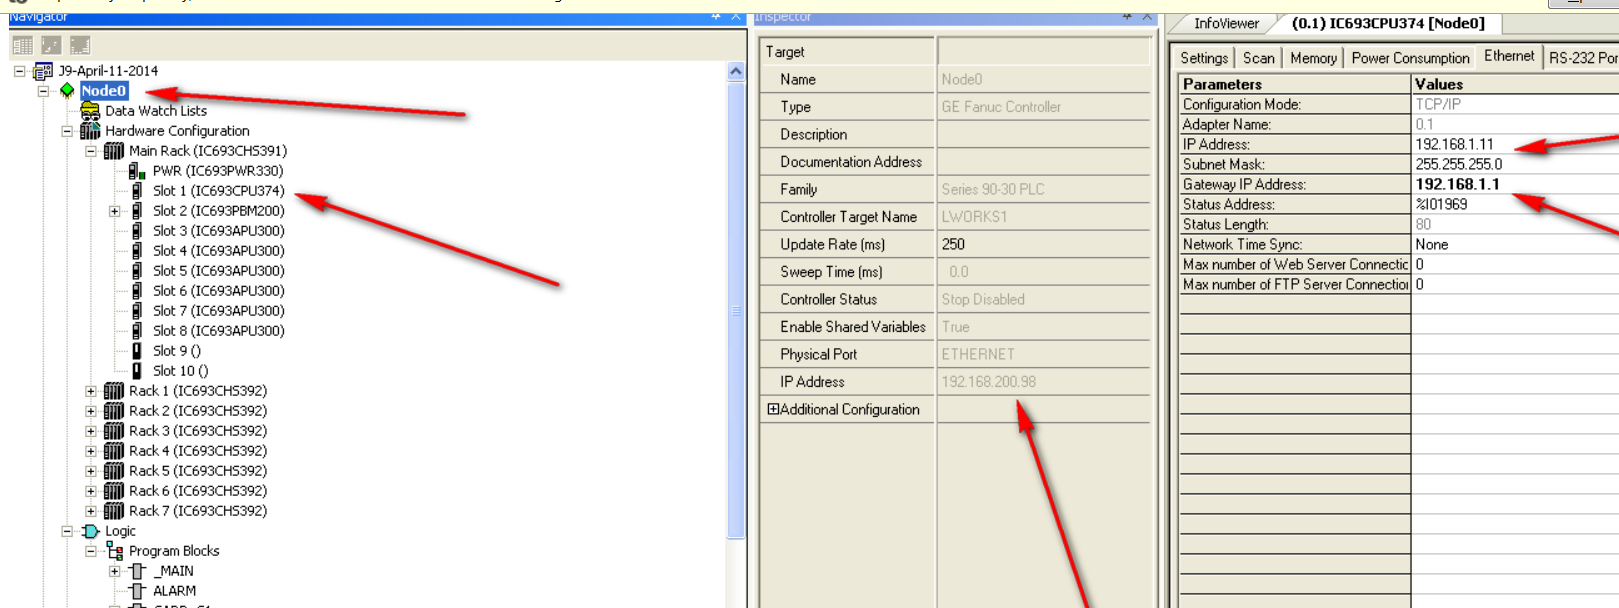
We entered the Field Device TCP Port number 18245 which was found by clicking on, “Click for a list of common TCP Ports” shown on the “Manage My Remote” screen, and we entered the hardware configured IP address of the PLC as 192.168.1.11 in the Field Device IP Address box.
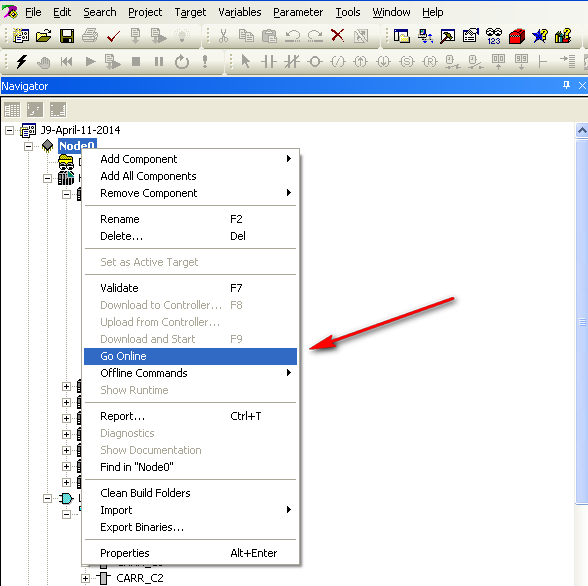
From the web page we see that the Tech Support Gateway address is 192.168.200.98 We opened up Proficy and the Proficy project , and entered the Tech Support Gateway IP address 192.168.200.98 in the center window, after selecting the Node we were working with. The right window shows the PLC hardware network configuration. Then we right clicked on the Node and went Online with the PLC. (status)
Go Online with PLC:
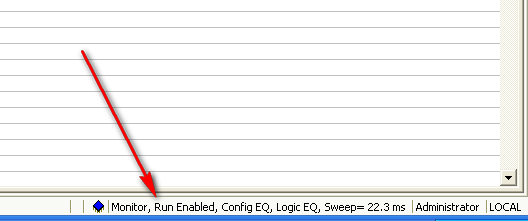
Status now shows Monitoring PLC:
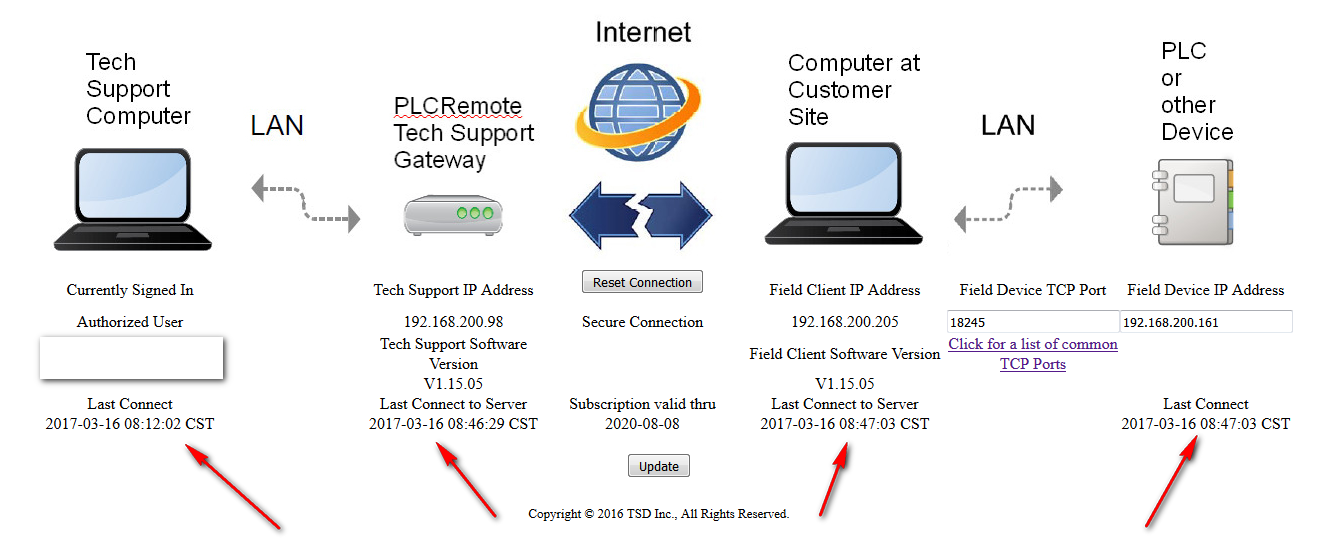
As a diagnostic check, a successful connection will show a current time stamp status on all devices as shown below on the web page “Manage My Remote” on the plcremote.net website. If one of the time stamps is not current, then this could indicate an issue with that device or the connection of that device.
Customer Computer Field Client Issues
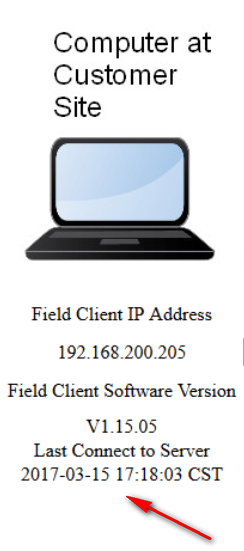
You will know the remote site customer computer running the field client software is experiencing issues, if the date and time status shown below on the web page “Manage My Remote” on the plcremote.net website is not showing a current status.
In addition you can also check the field client software App window where you a should see a connection made to plcremote.net on startup.
Things to check if this is an issue:
- Install the latest version of Oracle’s Java on the remote site customer computer running the field client.
- Download the latest copy of the field client App from plcremote.net which is available through your login.
- If the remote site gateway / router to the internet is blocking the connection, which can happen if IT has blocked TCP ports from connecting to the internet, then open up an outgoing port (allowing the customer computer to connect to the internet) on TCP port 8901 on the gateway/ router.
- If the antivirus software is blocking the App, allow the App to communicate on TCP port 8901, and/or grant privileges to java.exe
Rockwell (Allen Bradley) Step by Step Guide
Here is a session with a remote connection to a Rockwell Micrologix 1400 PLC.
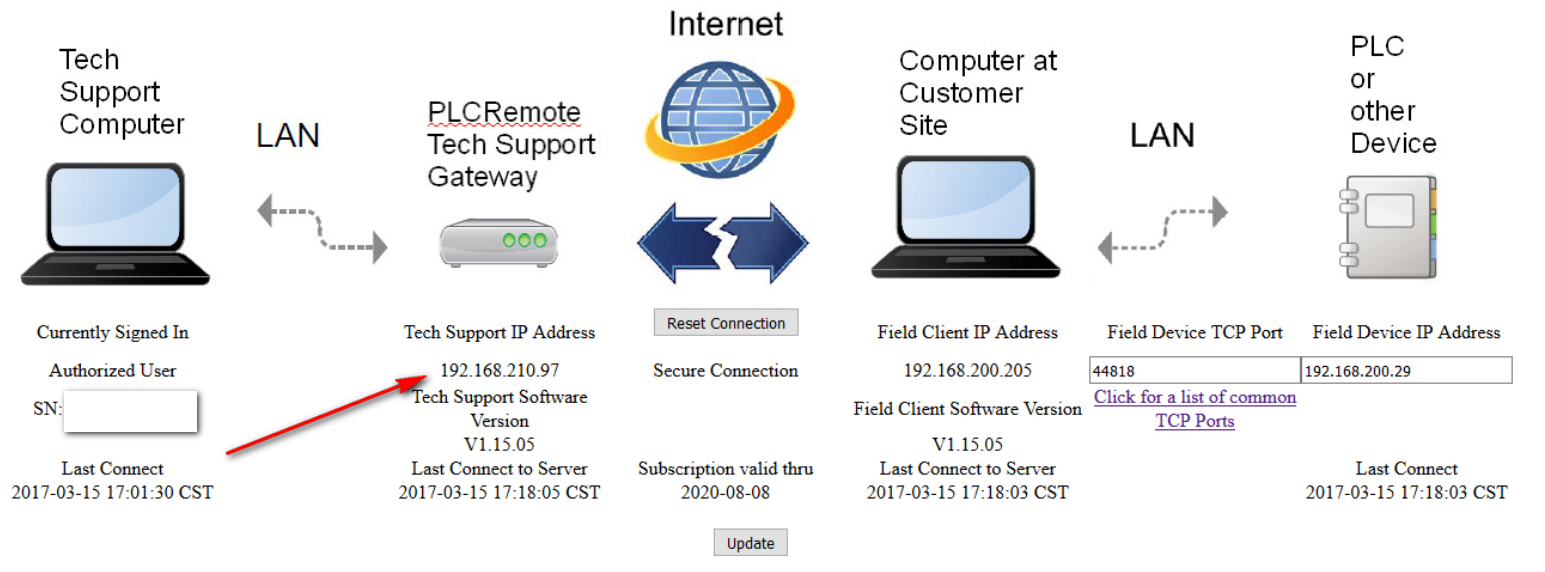
First login to your web page “Manage My Remote” on the plcremote.net website, and make a note of the IP address shown for the Tech Support Gateway ( see below for the location of the IP address which is 192.168.210.97). Click on any images below to enlarge.
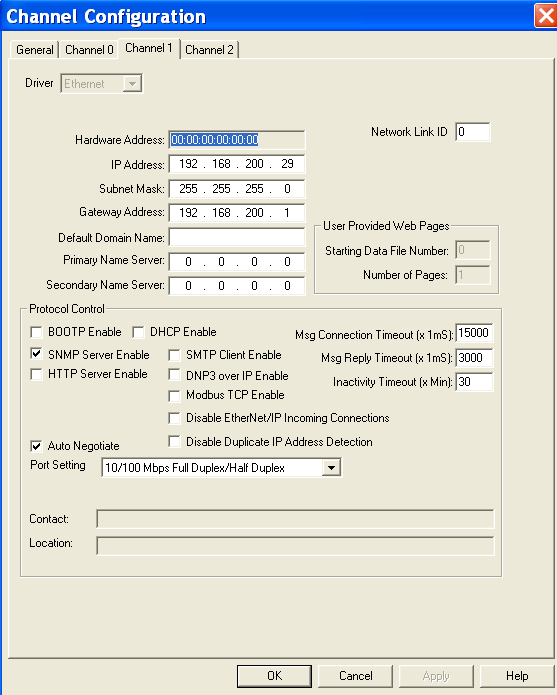
From Micrologix 500 we see the IP configuration of the PLC. It is assigned to 192.168.200.29
We entered the Field Device TCP Port number 44818 which was found by clicking on, “Click for a list of common TCP Ports” shown on the “Manage My Remote” screen, and we entered the hardware configured IP address of the PLC as 192.168.200.29 in the Field Device IP Address box.
Next open up RSLinx where you will enter the Tech Support Gateway IP address found above. Later, when the communications connections are made, the Tech Support Gateway will look like your PLC in the RSLinx RSWho view.
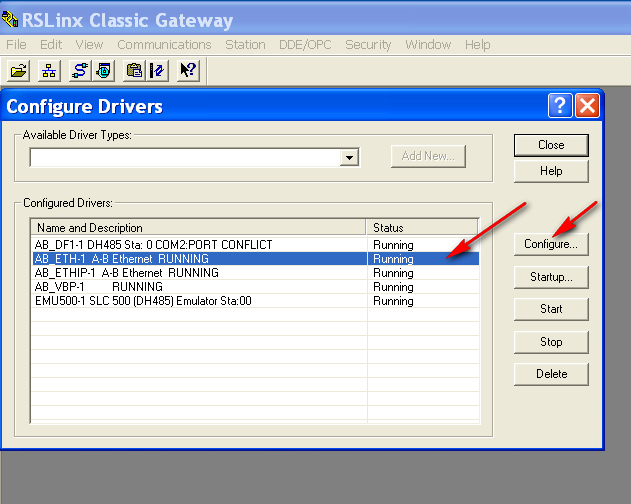
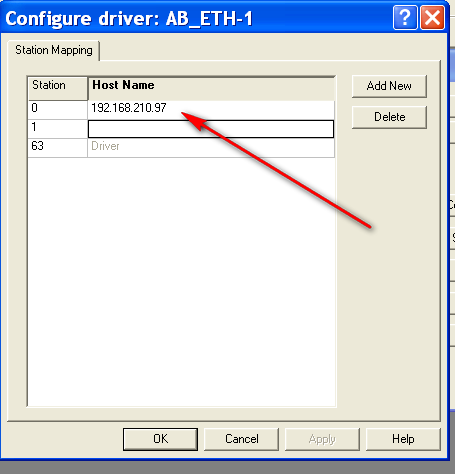
With RSLinx open, next open Configure the AB_ETH-1 Driver.
Add the IP address of the Tech Support Gateway (192.168.210.97) as shown on the “Manage My Remote” screen.
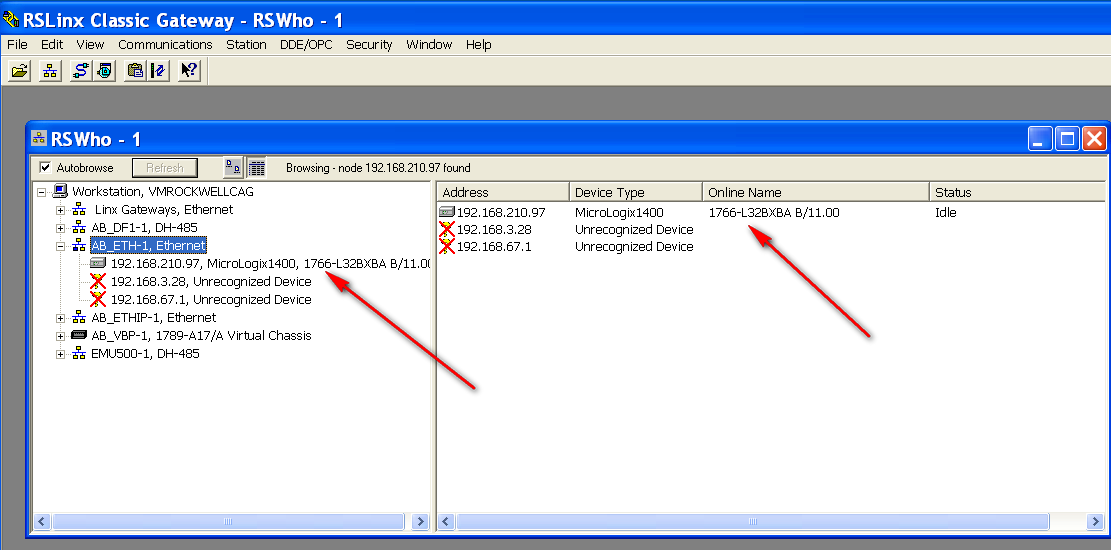
Open RSLinx RSWho View and if the connections are made, the IP Address of the Tech Support Gateway device will look like the PLC you are accessing by appearing with the name of PLC located at the remote site. In this case we touched the object 192.168.210.97 on the left side and it updated from a Red X to a Grey status meaning it saw the device available.
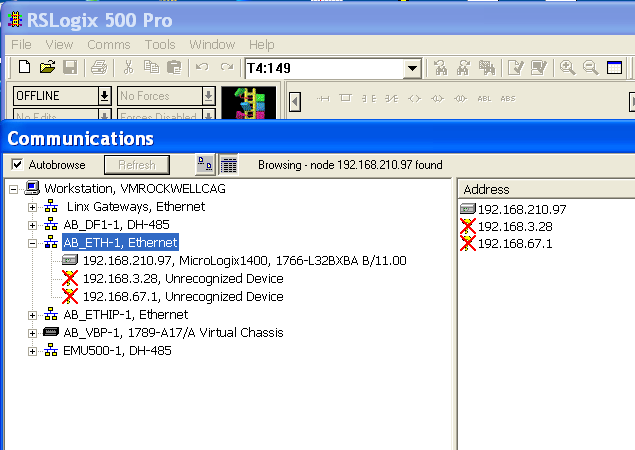
We then opened RSLogix 500, and checked the status under the Comms ==> System Comms Screen.
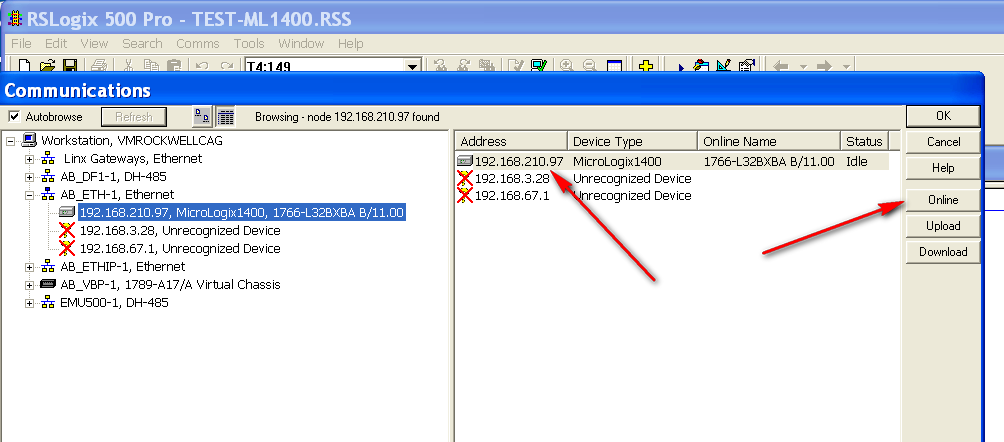
In this example we selected this device and proceeded to go Online with it to monitor the status of the PLC live.
As a diagnostic check, a successful connection will show a current time stamp status on all devices as shown below on the web page “Manage My Remote” on the plcremote.net website. If one of the time stamps is not current, then this could indicate an issue with that device or the connection of that device.